

Introduction
This article begins a new series on how to work with the Ethereum blockchain. In this article, you will get your hands dirty, so get a device that can connect to the internet and read attentively.
We will brush through the important knowledge about Blockchain architecture, smart contracts, and transactions on Ethereum.
Blockchain—for busy developers
The blockchain is a distributed ledger that can be decentralized or centralized. A blockchain network is made up of nodes, which are owned by miners. However, not all miners engage in mining activities, as some are responsible for executing smart contracts and processing transactions. These nodes communicate with each other through a peer-to-peer (P2P) protocol, typically using port 30303.
Underlying blockchain architecture
The blockchain is basically a chain of blocks. Each block is connected in a parent-child (one-to-one) relationship — forming the chain. The blocks have properties like the:
Previous Hash
Nonce
Merkle Root
Timestamp
Chain link
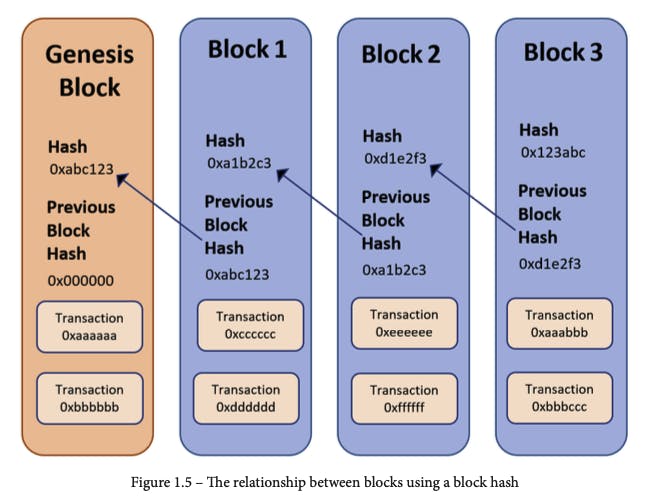
Only the genesis block is parent-less. The genesis block is initiated at the start of the chain from a genesis.json file.
💡 Find a detailed implementation of these concepts in a proper blockchain. Read this: Blockchain Architecture and Implementation.
Smart contracts, Ethereum Networks, Transactions, and the rest of Ethereum’s shenanigans
Ethereum is a Proof-of-Stake blockchain that extends its functionalities with the use of smart contracts. While Bitcoin’s blockchain only allows users to send and receive BTC (the native token), Ethereum goes the extra mile to enable users to build decentralized applications (dApps), financial solutions (DeFi), and even organizations (DAOs and DACs). These applications are possible on Ethereum, with the courtesy of smart contracts. The important components of Ethereum include:
The EVM
miners
blocks
transactions
consensus algorithm
accounts
smart contracts
Ether
gas
On Ethereum, two kinds of accounts can be created:
Externally owned account: accounts for people
Smart contract account: account for smart contracts
A smart contract is a custom logic and code deployed and executed by the Ethereum Virtual Machine (EVM). They store and transfer digital assets between accounts as an atomic transaction. They are similar to OOP objects, so they can call other smart contracts.
Solidity is the popular and recommended language for writing Ethereum smart contracts. After writing a smart contract, you will need to compile it for execution. The EVM is a runtime for executing smart contracts after compilation. Compilation can be done locally by using the Solidity Compiler called solc. We will install the compiler soon, but for now, let’s deal with the theory.
The compiler generates two major artifacts:
ABI definition
contract’s bytecode
Deploying a smart contract is a transaction. Like every other transaction, you have to pay real money because every activity on Ethereum that modifies its state charges Ether as a fee. The fee for deploying smart contracts on Ethereum is referred to as the gas fee, and there are units that measure gas fees—the smallest of them being the wei. Ethereum transactions are of three types:
transfer of Ether between two Ethereum accounts
deployment of a smart contract
using or invoking a function within a smart contract.
If you want to test a smart contract without deploying it live, or you are learning to write and deploy smart contracts, there is a solution to wasting real money deploying dummy contracts. Ethereum has four networks:
The mainnet: the live global network of Ethereum accessible by anyone with an account.
The testnet: a “black box” version for testing out concepts and smart contract code.
Private network: a network you can build for personal usage or for your organization only.
Consortium network: an exclusive network accessible to only selected organizations or bodies.
There are several testnets for Ethereum due to the need to reduce demand and increase performance. They include:
Kovan
Rinkeby
Ropsten
Goerli
To deploy contracts to a testnet, you would need to visit a “faucet” website to collect free fake Ether with a wallet address gotten from MetaMask under that particular network.
Writing smart contracts remotely
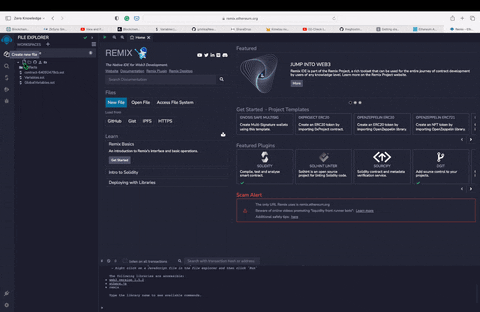
Solidity is the most suitable language to write smart contracts with. You can start writing contracts right from your browser without having to install anything in the first place. Navigate to Remix IDE on your browser. Note that we can also compile smart contract code remotely using Remix IDE. That said, you can also run a local version of Remix at https://github.com/ethereum/browser-Solidity.
The IDE opens to a FILE EXPLORER window. Like your local file explorer, you can manage files from the left navigation panel. Create a Hello.sol file and hit the Enter button. The code editing area opens automatically with the traditional numbered gutter.
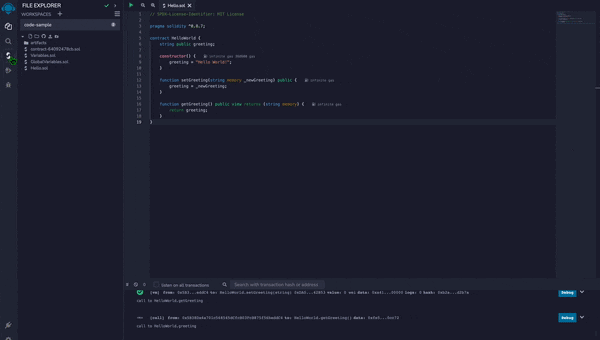
Using Remix IDE to build Solidity contracts.
Input the following code to create a contract that allows you interact with it when deployed:
// SPDX-License-Identifier: MIT
pragma solidity ^0.8.7;

contract HelloWorld {
    string public greeting;

    constructor() {
        greeting = "Hello World!";
    }

    function setGreeting(string memory _newGreeting) public {
        greeting = _newGreeting;
    }

    function getGreeting() public view returns (string memory) {
        return greeting;
    }
}
This smart contract has a single-state variable greeting which is a string that stores the greeting message. Let's go through the key components of the code:
// SPDX-License-Identifier: MIT: This is a commented line of code in Solidity, and it is compulsory to begin all Solidity code with a license.pragma solidity ^0.8.7;: This is the Solidity version declaration, indicating that the contract is written in Solidity version 0.8.7 or higher.contract HelloWorld { ... }: This defines a contract namedHelloWorldwhich is the main container for the code.string public greeting;: This declares a public string variable namedgreetingthat can be accessed from outside the contract. Thepublickeyword automatically generates a getter function that allows external parties to read the value ofgreeting.constructor() { ... }: This is a special function that gets executed when the contract is deployed. In this example, the constructor initializes thegreetingvariable to "Hello World!" when the contract is deployed.function setGreeting(string memory _newGreeting) public { ... }: This is a public function that can be called externally to set a new value for thegreetingvariable. It takes a string input_newGreetingas an argument and updates thegreetingvariable with the new value.function getGreeting() public view returns (string memory) { ... }: This is a public view function that can be called externally to read the current value of thegreetingvariable. It returns the value ofgreetingas a string.
Users can compile, deploy, and interact with this "Hello World" smart contract on Remix IDE by deploying it to a test network or the Ethereum mainnet, and then calling the setGreeting() and getGreeting() functions to interact with the contract and retrieve the greeting message.
Interacting with your smart contract
We will call the two functions in the smart contract code above from Remix IDE. To do this, we will compile the contract and deploy it. Then, we will create a new transaction to change the greeting. Let’s begin!
Click on the Solidity compiler button at the icon gutter in the extreme left panel.
Click on the Compile Hello.sol button.
Navigate back to the icon gutter and click on the Deploy & run transactions button.
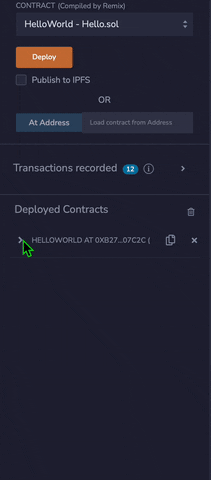
Click on Deploy and navigate down to the “Deployed Contracts” section in this panel.
In this section, click the drop down icon and click on getGreeting or greeting. You should see the “Hello World!” greeting we specified in the contract code.
Now, we will perform a transaction to change this greeting to “Hey, Ethereum!” To do this, click on setGreeting and the drop down icon beside the space bar. Enter the new message, and click Transact. After this, click on getGreeting or greeting to see the new message.
Because this operation involves a change in state, it is referred to as a transaction, and on the code editor, you will see a reference to the usage of gas fees. This should clarify all that we have discussed before now.
Final words
In this introductory series, we glanced through blockchain technology, Ethereum smart contracts, the Solidity programming language, and the nature of transactions on Ethereum. In the next article, we will learn about Ethereum clients and Ethereum accounts, including how to interact with both.
See you in the next article.